
Once again, I haven’t had a chance to take modeled pictures of this, but I’m so desperate for my first Summer of Basics finish, and so eager to show you this, I’m going ahead and posting it! I’ll add pictures of it on me when I can, so for now you’ll have to take my word for the fact that it’s a perfect fit! I am so proud of it.
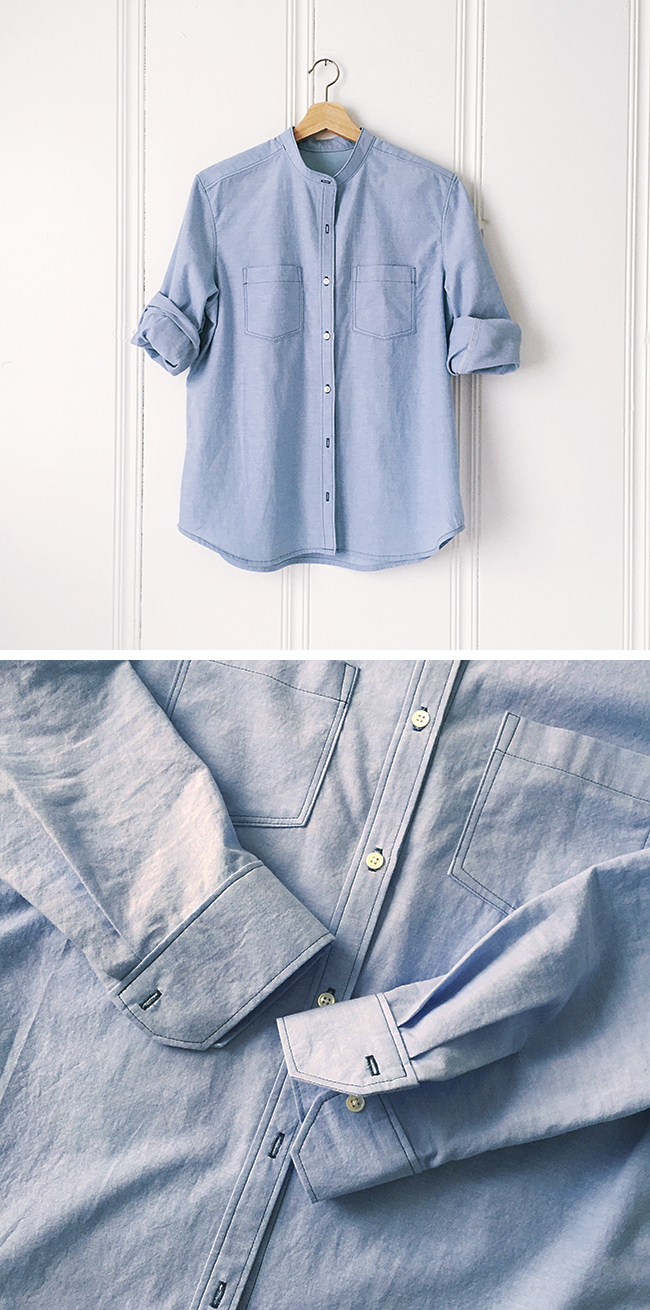
As you know, this is Grainline’s Archer Button-Up, and I get why the entire internet raves about this pattern all the time. It comes together so beautifully (all I did was follow the pattern instructions and Jen’s sewalong posts) and apart from the one confessed tantrum, I had fun sewing it. It made me realize the reason I don’t find sewing as thrilling as knitting is that I’ve never sewn anything as rewarding as this.
The fabric is also amazing, and I’m glad I snagged it before it sold out. It’s a Japanese cotton chambray that falls somewhere between dress shirt and work shirt. One of the reasons I was much more of a nervous nelly about this project than I usually am is that not only was the fabric sold out, but I had accidentally purchased half of what I thought I had. Like yarn, I try to always buy more fabric than I’m supposed to need, just in case. Well this time, I had too little. I had to find the closest possible match to cut the yoke facing out of, and couldn’t afford a single mistake since there was literally no more fabric to be had. So that was a little stressful! But thankfully it all turned out fine in the end.
. . .
I made only a few minor modications:
– It’s a straight size 14, except that the sleeve was shortened 2.5 inches and tapers to a size 6 in the lower arm and cuff. (The muslin sleeve went down to a size 10, but a cutting snafu led to the better decision to go even smaller at the cuff.) Next time I might add an inch or two to the body length.
– I made up my own pockets, and placed them a bit higher, too. The horizontal stitching line matches up to what would be the top edge of the original pocket placement. The top-stitching on my pockets is a bit dodgy, but y’know, presence of hand.
– Regarding my whole personal drama with the cuffs, I wound up assembling and then attaching them, a la the method described here. I basted the stitch line along the sleeve edge, and just had better luck easing the curve of the sleeve into the assembled cuff while keeping the placket and cuff edges in line.
– And I left off the collar, as I’m always lamenting the dearth of collarless shirts in the world, or cutting the collars off of things. I guess I was enamored with the idea of being able to say “look at this picture-perfect chambray shirt I made,” but when I stopped and asked myself what I actually wanted to wear and didn’t already have, it was collarless. That decision also led to my adding a second pocket, whereas I was originally going to do only one.
. . .
It was a great call to give myself the whole summer to do this, and to tackle it at a very leisurely pace — just sewing a little bit of it each weekend. But now that I’ve done one and know how it works, I expect to sew the next one in a week! And there definitely will be more. I’ve entered a whole new world where a shirt can fit my shoulders without being too huge everywhere else.
Pattern: Archer Button-Up by Grainline Studio
Fabric: Yarn-dyed chambray from Miss Matatabi
Cost: $18 pattern + $25 fabric + $11.25 buttons = $54.25
.
PREVIOUSLY in FOs: Grey pullover + striped muscle tee

Great job! glad it went well – aside from the cuff. And isn’t it wonderful when we figure out how to make something fit our far from industry average shape? :-)
Indeed!
Well done, Karen! And I prefer a collarless shirt as well. With longish, heavy hair it pushes down the collar in the back, and the front of the shirt is always askew. Can’t wait to see it modeled.
Thanks, Leah!
It’s gorgeous ! I was afraid of approaching this pattern, but I might just try it soon….
It’s like anything, in that if you just take it one step at a time, you wind up with something amazing! It did help that I was putting no time pressure on myself, since I was reading the sewalong posts/watching the videos where there was one before each step, and then I’d do it, have a little win, step away till the next time. And like I said, now that I’ve done it, the next one will be a breeze! You can totally do it.
You should be proud! Just look at all that top stitching, beautiful.
I think that top stitching looks great, too!
I pride myself on being a good top-stitcher — years and years of practice, although I really think a lot of the credit goes to my new Janome, which is just super smooth — which is why the imperfect pocket stitiching bugs me a little. But it’s totally fine! Nobody but me will every notice. Most of it.
Kudos, Karen, it’s beautiful! And every time you wear it, you will feel proud. I feel that way about my Archers probably more than most of what I’ve made. Not sure why, but it’s true.
For me, and maybe for you?, the funnest things are the ones that look so right and ordinary that nobody would ever think to ask you if you made it. This is the star of that category, I think.
Looks great! You will enjoy it – I have made a couple for me and a couple for my daughter. They are comfy to wear!
Lucky daughter!
It’s incredible. I’m in awe.
The shirt inspires confidence to try it myself at some point. Looks great and really reflects your aesthetic. Nice work!
Do it!
The shirt looks perfect! Now that it’s done and posted, it is time to stop thinking of its flaws and think of it as perfect.
Back in days of yore, when mass market clothes were made all over America, including Cleveland, I had a co-worker who had held a previous job as the sample maker for Bobby Brooks, then a major maker of junior sized clothing. From her I learned that there were many prototypes for each garment that actually made it into the line to be sold, And that she might be called upon to make a dozen collars before one was chosen, so a summer is nothing. Her own wardrobe was beautiful, and perfectly sewn, and the secret she shared was that almost every little imperfection disappeared with a whole lot of steam. Every time I asked her why my cuff, collar, etc didn’t look like hers, I was told I had to go back to the steam iron. (Of course there were a couple of times when she suggested that I just recut and start over!) Just like blocking is to knitting I learned.
Oh yes, I am a huge believer that the success of any sewing project is about 80% in the ironing. Weirdly, I hate ironing my clothes but I looooove all of the ironing in the sewing process. It soothes my OCD side seeing everything get all crisped and neatened at every turn.
BRAVO! Your Archer came out very nicely. Don’t you feel so proud of yourself now? What are you sewing next??? Inquiring minds want to know. ; )
To anyone who wants to sew well, I KNOW you can do it!
Read the pattern instructions until you are very familiar with them, use many pins, baste often, iron like there is no tomorrow, don’t be in a hurry – take time with each step, and the next thing you know you will have a perfect garment… just like Karen’s.
It’s beautiful. You did good. Do you think that the chambray is coming back? The fabric is so beautiful.
Sorry, I don’t have any way of knowing. But I’d love to have more myself!
Congratulations!!! Your shirt looks great! I liked the modifications you made! Very nice work!!!
I have this pattern and I loved sewing it the first time. The second time around I’m going to have to try leaving off the collar as well. My husband has a shirt with a mandarin collar that I love but I agree with you that you can’t find those for women very easily!
My husband and I are both big collar removers. I think the next time I do a collarless one of these, I might widen the collar stand just a tiny bit.
I’m very impressed! I think sewing in periods, stopping before you are tired, might be a light bulb moment for me. I’ve had this pattern for ages and have been too chicken to cut. I assume you used your collar stand for your mandarin collar. No one will believe you made it because it just looks perfect.
Yep, I just attached the collar stand without the collar. So I sewed the interfaced half of it to the outside of the shirt, then attached the inner stand to that, turned it inwards/right-side-out, pressed the bottom edge under, and top-stitched it all in place.
Fine job! No fringe hangin’ outta those seams. I read through the cuff link you provided. Saw two things new to me – 1) a one piece cuff and 2) the way Maris folds the 2 long cuff SAs to the interfaced side instead of mirroring those folds back-to-back. Very cool – will explore that site some more. Thanks
The only trick about sewing it separately like that is getting the resulting length of it (what’s left after the seam allowances) to perfectly match the length of the sleeve edge. What I did was sew the ends at closer to 5/8″ instead of 1/2″, so my cuff was literally a tiny bit shorter than the sleeve edge, and I basted along the stitch line on the sleeve edge, which allowed me to ease it into the cuff length just like setting in a sleeve. Does that make sense?
Yes, that makes sense. I might have left a sleeve pleat pinned (not sewn) for an easy adjustment point of a bit of sleeve edge.
I love how your Archer turned out! You should be very proud of yourself and your new sewing skills. I have two questions: where did you find the Mandarin collar pattern? and please tell me about the buttons. I noticed that they cost $11.25…….is that standard these days or are they something special?
p.s. I’m sorry I didn’t get to participate in your support project yesterday. I was gone all day and by the time I read your blog last evening, it was over. I’m so glad that you stood up and supported such a worthwhile cause. Thank you from the bottom of my heart!
The collar is from the Archer pattern — it’s just the collar stand without the collar sandwiched into it.
The little pearly workshirt buttons were $1.25 apiece at a local fabric shop. They can really add up, but I believe in good quality buttons. They really polish a garment.
This finished shirt reminded me to thank you. Thank you so much for forwarding the State the Label smock images through your blog. I am now wearing my own smock, remade from one of my husband’s cast-off shirts. I looked at the images, thought about it, and came up with my own version yesterday. (It was a more eco-friendly and affordable approach for me, since shipping alone would cost too much for me in Canada) I do feel guilty as it is something of a “rip-off” of someone else’s idea, but it sure salvages a great shirt and gives me a world of with more pockets. (I always need more pockets.)
I can see a great deal of wear ahead in this! Thanks so much for exposing me to this.
Impressive. And inspiring, even though I have buttonhole phobia (this from a person who has tutorials on knitted buttonholes).
Looks beautiful! Excellent work and I love the topstitching. Congrats on the first finish!
A true classic with a twist. I can see it is going to fit with most of your wardrobe. Beautiful job !
In a word — wow. Your topstitching and button holes elevate the whole shirt. Nicer than many (probably most) commercially available garments. You are inspiring me to pull out my sewing machine and get to work.
Wow it looks incredible! And most importantly it sounds like the end result is exactly what you wanted! I’ve enjoyed getting a sneak peak into your sewing and thought process while making this and can really appreciate how worthwhile it is to not shy away from going back and making alterations if your gut is telling you something isn’t quite right. I’ve made the archer several times (it’s a firm favourite) but you’ve inspired me to go back and tweak the fit a bit more on my next one.
fantastic! I really like the fabric you used and the buttonholes look great
Great work!
Pingback: 2017 FO-9 : Best-ever baby gift | Fringe Association
I am in awe of your top-stitching. (I sewed many of my own clothes back in the day, but job and children got in the way. Maybe I need to revisit that skill?)
Pingback: 2017 FO-10 : My first pants (SoB-2) | Fringe Association
Pingback: And the winners are … | Fringe Association
Pingback: Queue Check Addendum: Reader, I cast on | Fringe Association
Pingback: 2017 FO-12 : My first jeans | Fringe Association
Pingback: Fall ’17 wardrobe planning, part 2: Closet inventory | Fringe Association
Pingback: The cost (and payoff) of handmade | Fringe Association
Pingback: 2017: My sewing year in review | Fringe Association
Pingback: Queue Check — December 2017 | Fringe Association
Pingback: Deep Winter wardrobe: Closet inventory | Fringe Association
Pingback: Spring ’18 wardrobe: Haves and have-nots | Fringe Association
Pingback: Me and the Spring 10×10 Challenge | Fringe Association
Pingback: 10×10 Challenge: Lessons learned | Fringe Association
Pingback: Get planning! Summer of Basics 2018 is coming! | Fringe Association
Pingback: Portugal part 4: What I wore | Fringe Association
Pingback: Linen-cotton Carolyn pants (2018 FO-20) | Fringe Association